Introduction: Regular oil changes are vital for keeping your car’s engine running smoothly and prolonging its lifespan. While it may seem like a daunting task, changing your oil is a straightforward process that any DIY mechanic can learn. In this guide, we’ll walk you through the step-by-step process of changing your car’s oil, empowering you to take control of your vehicle’s maintenance.
Step 1: Gather Your Materials Before you start, gather all the necessary materials and tools.
The Tools You’ll need:
- New oil (check your owner’s manual for the correct type and viscosity)
- Oil filter
- Oil filter wrench
- Wrench or socket set
- Oil drain pan
- Funnel
- Shop towels or rags
- Car jack and jack stands (if necessary)
- Safety gloves and eye protection
Step 2: Prepare Your Car Park your car on a level surface and engage the parking brake. Let the engine cool down for a few minutes to avoid burning yourself on hot components. If your car has been running, the oil will be hot, so use caution.
Step 3: Locate the Oil Drain Plug and Oil Filter The oil drain plug is typically located on the bottom of the engine oil pan. Place the oil drain pan underneath the plug to catch the old oil. The oil filter is usually located near the bottom of the engine, but its exact location can vary depending on the make and model of your car.
Step 4: Drain the Old Oil Using a wrench or socket set, loosen the oil drain plug in a counterclockwise direction. Once it’s loose, carefully remove the plug by hand, allowing the old oil to drain into the pan. Be prepared for the oil to flow out quickly. Let the oil drain completely.
Step 5: Remove the Old Oil Filter Using an oil filter wrench, loosen the old oil filter by turning it counterclockwise. Once it’s loose, unscrew it the rest of the way by hand. Be careful, as the filter may still contain hot oil. Allow any remaining oil to drain into the pan.
Step 6: Install the New Oil Filter Before installing the new oil filter, apply a thin layer of clean oil to the rubber gasket on the filter. This will ensure a proper seal and make it easier to remove during the next oil change. Screw the new filter onto the engine by hand, turning it clockwise until it’s snug. Do not overtighten.
Step 7: Replace the Oil Drain Plug Once all the old oil has drained out, wipe the oil drain plug clean with a rag. Inspect the sealing washer for any damage and replace it if necessary. Then, reinstall the drain plug and tighten it securely with a wrench.
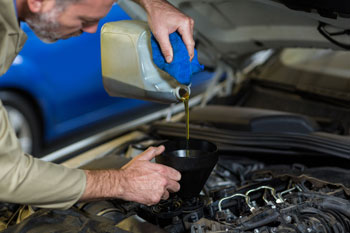
Step 8: Add Fresh Oil Using a funnel to avoid spills, pour the correct amount of new oil into the engine. Check your owner’s manual for the recommended oil capacity. Once you’ve added the oil, replace the oil filler cap securely.
Step 9: Check the Oil Level Start the engine and let it run for a few minutes to allow the new oil to circulate. Then, turn off the engine and wait a few minutes for the oil to settle. Use the dipstick to check the oil level, adding more if necessary to bring it to the proper level.
Step 10: Dispose of the Old Oil Properly Pour the old oil from the drain pan into a sealed container and take it to a recycling center or an auto parts store that accepts used oil for recycling. Do not pour it down the drain or onto the ground.
Conclusion: Congratulations, you’ve successfully changed your car’s oil! By following this step-by-step guide, you’ve not only saved money on a basic maintenance task but also gained valuable knowledge about your vehicle. With regular oil changes, you’ll keep your engine running smoothly for miles to come.
Disclaimer:
The information provided in this blog is for educational and informational purposes only. While we strive to provide accurate and up-to-date content, we cannot guarantee the completeness, accuracy, or reliability of the information presented.
It is important to understand that car engine and body repairs can be complex and potentially hazardous tasks. We are not professional auto mechanics, and the DIY techniques and tips provided should be used at your own discretion and risk.
We strongly advise consulting with a qualified and certified auto mechanic before attempting any repairs or modifications on your vehicle. Professional mechanics have the training, experience, and specialized equipment necessary to diagnose and address automotive issues safely and effectively.
By using the information presented in this blog, you agree that we shall not be held responsible or liable for any damages, injuries, or losses that may occur as a result of DIY car repairs. Always prioritize your safety and the well-being of your vehicle by seeking professional guidance when needed.
Amazon Affiliate Marketing Disclaimer: As an Amazon Associate, I earn from qualifying purchases. This means that if you click on an Amazon link included in this blog and make a purchase, I may earn a commission at no additional cost to you. This helps support the maintenance of this blog and allows me to continue bringing you valuable content on DIY auto repairs. Thank you for your support!
Hi, this is a comment.
To get started with moderating, editing, and deleting comments, please visit the Comments screen in the dashboard.
Commenter avatars come from Gravatar.